
MirrorFly iOS SDK is the easiest way to add real-time messaging, video calling, voice calling and 1000+ custom CPaaS features into any iOS app. It comes with 500+ AI-powered features that can automate the conversational flow of your platform in just about 24 hours.
The key highlights of MirrorFly iOS SDK include complete customization over features and security, support for on-premise/ on-cloud deployments, full data sovereignty and complete source code access. The SDK is easy to install and integrate an extensive range of communication features within hours.
MirrorFly helps build omni-channel communication apps for any kind of business
💬 In-app Messaging - Connect users individually or as groups via instant messaging features.
🎯 HD Video Calling- Engage users over face-to-face conversations anytime, and from anywhere.
🦾 HQ Voice Calling - Deliver crystal clear audio calling experiences with latency as low as 3ms.
🤖 AI Voice Agent - Build custom AI voicebots that can understand, act and respond to user questions.
🤖 AI Chatbot - Deploy white-label AI chatbots that drive autonomous conversations across any web or mobile app.
🦾 Live Streaming - Broadcast video content to millions of viewers around the world, within your own enterprise app.
The below are the requirements for chat SDK for iOS,
- Xcode 15.0 or later
- iOS 13.0 or later
- Swift 6.0 or later
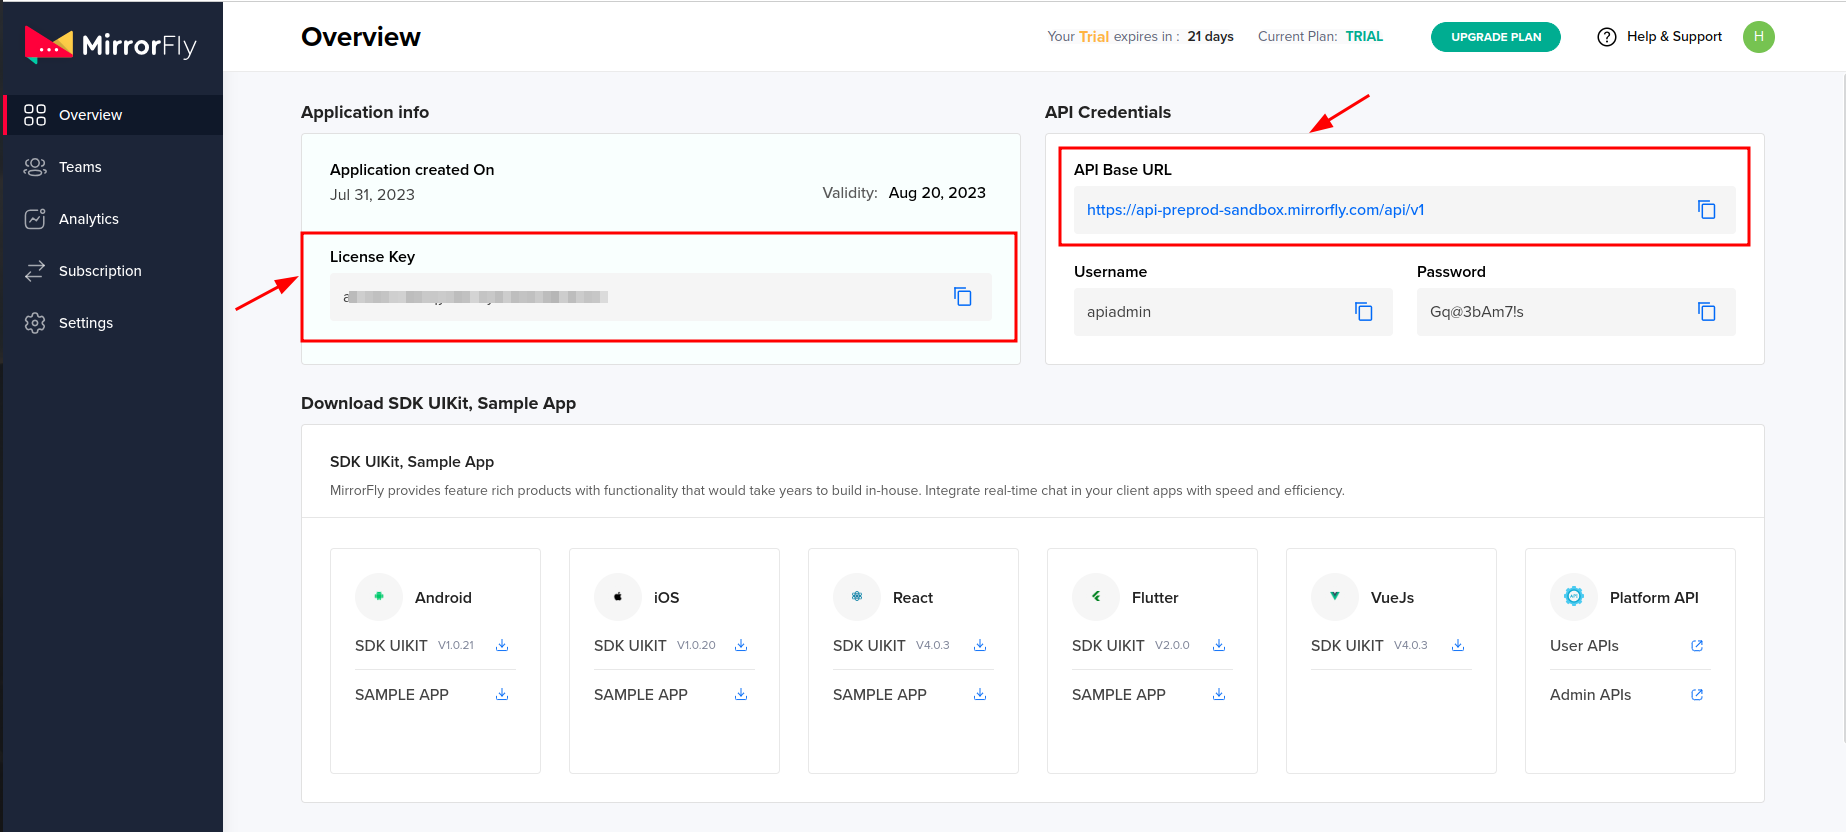
To integrate the MirrorFly Chat SDK into your app, you need an SDK License Key. The MirrorFly server uses this key to authenticate the SDK in your application.
Step 1: Register here to get a MirrorFly User account.
Step 2: Login to your Account
Step 3: Get the License key from the application Info’ section
Step 4: Download the iOS SDK
Step 1: Add the ChatSDK pod to your Podfile. If you haven’t initialized CocoaPods yet, create a Podfile by running the pod init command.
pod 'MirrorFlySDK', '5.18.22'Step 2: Add the following pod hook code block at the end of your Podfile, then install the pods by running the pod install command.
post_install do |installer|
  installer.pods_project.targets.each do |target|
    target.build_configurations.each do |config|
      config.build_settings['IPHONEOS_DEPLOYMENT_TARGET']        = '13.0'
      config.build_settings['ENABLE_BITCODE']                     = 'NO'
      config.build_settings['APPLICATION_EXTENSION_API_ONLY']     = 'No'
      config.build_settings['EXCLUDED_ARCHS[sdk=iphonesimulators*]'] = 'arm64'
      config.build_settings['BUILD_LIBRARY_FOR_DISTRIBUTION']     = 'YES'
    end
  end
end
Step 3 : Now, disable the bitcode for your project
Goto Project -> Build Settings -> Filter the term `Bitcode` -> and select No from the dropdown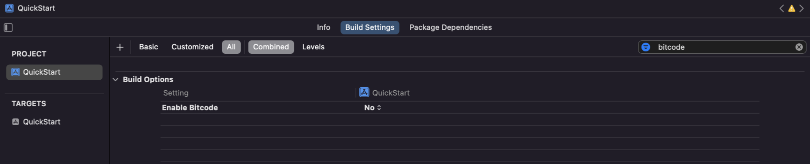
Configure the server details in the SDK, then access the data globally through the AppDelegate class.
You can copy the license key from the Overview section in the Console dashboard.
let LICENSE_KEY = "xxxxxxxxxxxxxxxxxxxxxx"Add the following import statement before using the SDK anywhere in your project.
import MirrorFlySDKTo start using the SDK, you need to provide a few basic pieces of information so it can work properly. The initializeSDK function handles this by checking your license key and pulling the important setup data from the server.
In your project, you should call this initialization method inside the AppDelegate class, specifically in the didFinishLaunchingWithOptions method. Just pass in your license key. Here’s an example to show how it works.
ChatManager.initializeSDK(licenseKey: LICENSE_KEY) { isSuccess, flyError, flyData in
    // handle initialization result
}
![AppDelegate][image4]
Use the method below to register a new user. This single method handles registration for both Sandbox mode and Live mode.
Make sure you call the registration method only once in your app, unless the user has logged out of their session.
try! ChatManager.registerApiService(for: USER_IDENTIFIER) { isSuccess, flyError, flyData in
    let data = flyData
    if isSuccess {
        // This is your Username
        guard let username = data["username"] as? String else {
            return
        }
        // This is your JID
        // Ex. [email protected] (USER_IDENTIFIER + @ + domain of the chat server)
        guard let userJid = data["userJid"] as? String else {
            return
        }
    } else {
        let error = data.getMessage()
        print("#chatSDK \(error)")
    }
}
To know more about FlyCompletionHandler click here
Caution
If IS_FORCE_REGISTER is set to false and the user has already reached the maximum number of allowed sessions, the registration will fail and return a 405 error. To continue, either set IS_FORCE_REGISTER to true or log out one of the existing sessions before trying again.
Note: If you want to use your own ID, you can use the userJid provided in the registration response.
let userProfile: ProfileDetails = ContactManager.shared.saveTempContact(
    userId: "OUR OWN JID",
    name: "OUR NAME"
)
Info
After registration, save your own contact details in the database. These details are needed when you send group messages. Use the method below to store your contact information.
To create a unique user ID, pass the username into the method like this:
After registration is successful, the ChatSDK automatically tries to connect to the chat server. It also watches for changes in your app’s state and will connect or disconnect from the server as needed.
You can track the connection status by using the ConnectionEventDelegate. To do this, set the delegate in your ViewController’s viewDidAppear method, like this.
ChatManager.shared.connectionDelegate = selfAfter you set the ConnectionEventDelegate, you’ll start receiving connection status updates through the delegate method shown below.
func onConnected() {
    // Navigate to Conversation screen
}
To know more about ConnectionEventDelegate visit ConnectionEvent Delegate
To generate a JID for any user, use the method shown below.
try? FlyUtils.getJid(USER_NAME)Use the method below to send a text message from one user to another.
var textMessage = TextMessage()
textMessage.toId        = TO_JID
textMessage.messageText = TEXT

FlyMessenger.sendTextMessage(messageParams: textMessage) { isSuccess, error, chatMessage in
    if isSuccess {
        // Update the UI
    } else {
        // Handle the error
    }
}Set the delegate in your ViewController’s viewDidAppear method using the syntax below and implement the MessageEventsDelegate class to receive incoming messages and related events.
ChatManager.shared.messageEventsDelegate = selfOnce the delegate is set, the app can receive incoming messages through the method shown below. Refer to the MessageEventsDelegate class for details on other available methods.
func onMessageReceived(message: ChatMessage, chatJid: String) {
    // Message received from chatJid, content is message.messageTextContent
}For audio call, the below permissions:
Record PermissionYou can use the below method to check audio call permissions:
CallManager.isAudioCallPermissionsGranted()For video call, we need below permissions:
Record Permission
Video Permission
You can use the below method to check video call permissions:
CallManager.isVideoCallPermissionsGranted()To send custom data when making a call, use the optional metaData parameter in all makeCall methods. This parameter accepts an array of type CallMetadata.
Caution: The Call SDK processes only the first three metadata elements. Avoid including large data, as it may interfere with the successful transfer of the VoIP call payload.
The voice call feature enables users to initiate a one-to-one audio call with another SDK user, including optional call metadata. Use the following method to make a voice call:
try CallManager.makeVoiceCall(TO_USERID, CALL_METADATA) { isSuccess, flyError in
    if isSuccess {
        // SDK will take care of presenting the Call UI.
        // It will present the ViewController that is passed using
        // the method `CallManager.setCallViewController()`
    } else {
        let errorMessage = flyError?.description
        print("makeVoiceCall failed with error \(errorMessage ?? "")")
    }
}The video call feature allows users to initiate a one-to-one video call with another SDK user, including optional call metadata. Use the following method to make a video call:
try CallManager.makeVideoCall(TO_USERID, CALL_METADATA) { isSuccess, flyError in
    if isSuccess {
        // SDK will take care of presenting the Call UI.
        // It will present the ViewController that is passed using
        // the method `CallManager.setCallViewController()`
    } else {
        let errorMessage = flyError?.description
        print("makeVideoCall failed with error \(errorMessage ?? "")")
    }
}The group voice call feature enables users to initiate a voice call with multiple SDK users, including optional call metadata. Use the following method to make a group voice call:
try CallManager.makeGroupVoiceCall(USERID_LIST, GROUP_ID, CALL_METADATA) { isSuccess, flyError in
    if isSuccess {
        // SDK will take care of presenting the Call UI.
        // It will present the ViewController that is passed using
        // the method `CallManager.setCallViewController()`
    } else {
        let errorMessage = flyError?.description
        print("makeGroupVoiceCall failed with error \(errorMessage ?? "")")
    }
}The group video call feature allows users to initiate a video call with multiple SDK users, including optional call metadata. Use the following method to make a group video call:
try CallManager.makeGroupVideoCall(USERID_LIST, GROUP_ID, CALL_METADATA) { isSuccess, flyError in
    if isSuccess {
        // SDK will take care of presenting the Call UI.
        // It will present the ViewController that is passed using
        // the method `CallManager.setCallViewController()`
    } else {
        let errorMessage = flyError?.description
        print("makeGroupVideoCall failed with error \(errorMessage ?? "")")
    }
}After a call is connected, you can add users to the ongoing call. The SDK provides methods to invite users, and once they accept the incoming call, they will join the active call.
CallManager.inviteUsersToOngoingCall(USERID_LIST) { isSuccess, flyError in
    if isSuccess {
        // users invited to ongoing call
    } else {
        let errorMessage = flyError?.description
        print("inviteUsersToOngoingCall failed with error \(errorMessage ?? "")")
    }
}Whenever you receive an audio or video call from another SDK user, report it to FlyCallSDK using NotificationCenter.
NotificationCenter.default.post(
    name: NSNotification.Name("CallPayloadReceived"),
    object: messageDict
)
Through messageDict pass the payload of the call.
Whenever you make an audio or video call to another SDK user and want to disconnect either before the call connects or after the conversation ends, call the following SDK method when the user presses the disconnect button in your call UI. This will end the call and notify the other participant.
CallManager.disconnectCall()MirrorFly offers full freedom with the hosting options:
Self-hosted: Deploy your client on your own data centers, private cloud or third-party servers.
Check out our multi-tenant cloud hosting
Cloud: Host your client on MirrorFly’s multi-tenant cloud servers.
Check out our multi-tenant cloud hosting
MirrorFly offers a fully-built client SafeTalk that is available in:
- iOS
- Android
You can use this client as a messaging app, or customize, rebrand & white-label it as your chat client.
- Developer Documentation
- Product Tutorials
- Dart Documentation
- Pubdev Documentation
- Npmjs Documentation
- On-premise Deployment
- See who's using MirrorFly
Need a tech team to build your enterprise app? Hire a full team of experts. From concept to launch, we handle every step of the development process. Get a high-quality, fully-built app ready to launch, carefully built by industry experts
If you’d like to take help when working with our solution, feel free to contact our experts who will be available to help you anytime of the day or night.
We're always on the lookout for talented developers, support specialists, and product managers. Visit our careers page to explore current opportunities.